The Triumph Tiger 90
Project
The T90 is an interesting
motorcycle to say the least. Most
triumph fans are familiar with Triumph’s Twenty
One.
That bike with its twin cylinder unit construction 350cc (21 cubic inch)
engine was introduced in 1957. The
total rear enclosure often referred to as a bathtub kept the rider dry on wet
roads. Although today it is considered
the pinnacle of motorcycle art and is highly sought after, then it was regarded
as ugly and did not convey the sporty look that the riders craved. As
a result it was not a commercial success. Nevertheless its engine paved the way for the
highly successful unit construction 650’s
introduced in the 1960’s. The basic unit 650 power plant continued to be used
by Triumph motorcycles until the company’s demise in the early eighties.
The 350cc engine was beefed up to become the 500cc engine that powered
the T100 which was also very successful and lasted until the early 70s when
Triumph started to suffer financial woes. The 500 engine dominated
AMA racing in those days. To learn
more about the 500cc bikes go to Thomas’ T100
Adventure.
Triumph did not stop making
the 350cc twin when they introduced the T100. In England
where motorcycles were being used for basic
transportation and petrol was very expensive, there was a good market for a
medium sized economical motorcycle. Triumph
basically took the sporty looking T100 chassis and put the 350 twin into it.
The cases for the 2 engines were identical so they bolted right up. They
made the 350 a little cheaper by not including a tachometer and using a single
petcock on the fuel tank. The 350cc model was called the T90 and these sold well in
England
but Americans stuck their nose up at them.
With 25 cent per gallon gas, fuel consumption was a non issue and for $50
more they could get the T100. As a
result the T90 did not sell in America.
According to Triumph factory records 25 T90s were delivered to America in 1963
and 5 in 1964. That is why they are
so rare in the states
By the way Triumph chose its model numbers
based on the estimated top speed. The
T120 Bonneville was estimated to go 120 MPH., the T100: 100 MPH, and the T90: 90
MPH. These were all very optimistic
in my experience but apparently with a little help from Triumph’s tuners they
were achieved those speeds at least once.
I had seen some Twenty Ones in my career but I had never seen a T90 in the
flesh until one came up for sale here in mobile.
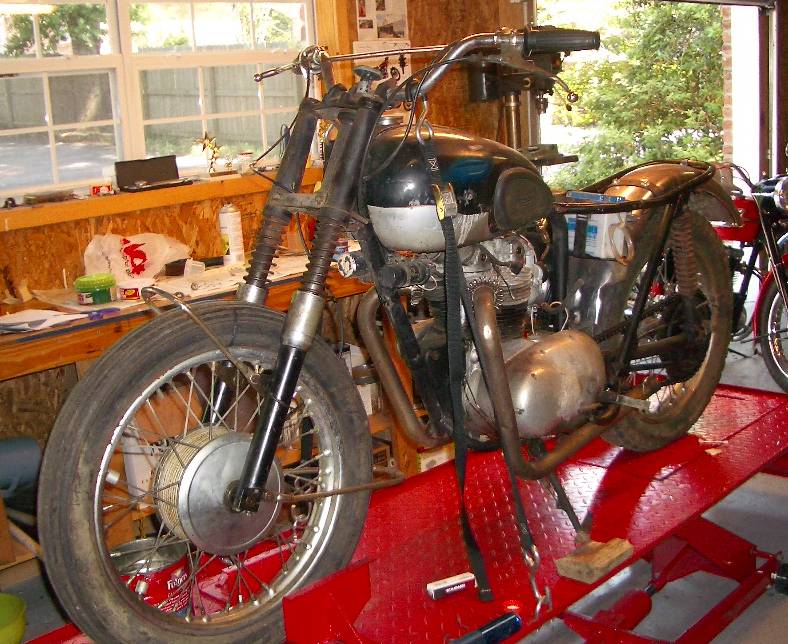
The bike was a very ragged out rust bucket that had apparently spent some
years as a racer. The motor actually
would start and run although the transmission was inoperative.
I acquired it in a horse trade and thought it would make an interesting
restoration project. It had the old style British tank complete with parcel grid. The remnants
of the paint indicated that it had been metallic blue over silver.
According to the serial numbers and the tank mount it was a 1965 model. The fenders were
missing along with most of the sheet metal. A
750’s chrome rear fender had been scabbed onto it.
The previous owner had
started to collect parts for it before he became overwhelmed with the sheer
magnitude of the project. New
header pipes, a gasket set, left side cover, a new battery, a new Amal carb, and
a clutch set were included in the pile. I started
scrounging parts. It was made easier
because most of the chassis parts were shared by the T100 and there are lots of
T100 parts on ebay. I eventually found a seat, front and rear fenders, chain
guard, fender braces, center stand, tail light, rigid foot pegs, mufflers,
headlight ears, light switch, handlebars, etc.
Most of it was obtained at reasonable prices from eBay.
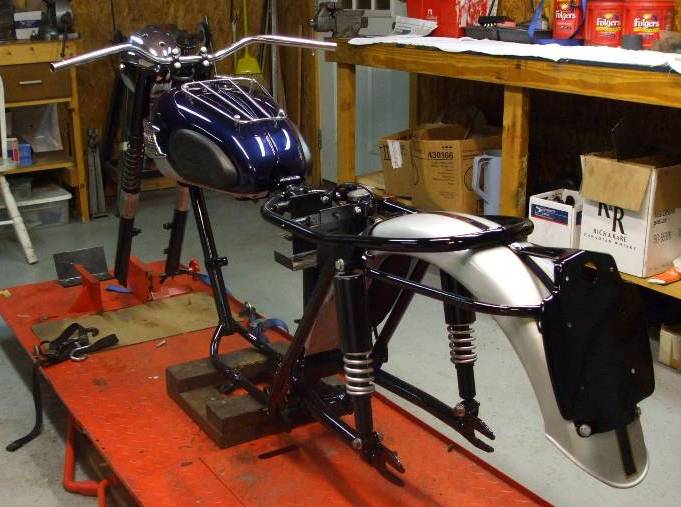
The restoration started with disassembling everything.
The frame and its components were blasted to bare metal and painted
black. The tank was etched for rust and relined with Kreem. All body work was
straightened and imperfections were filled with Bondo.
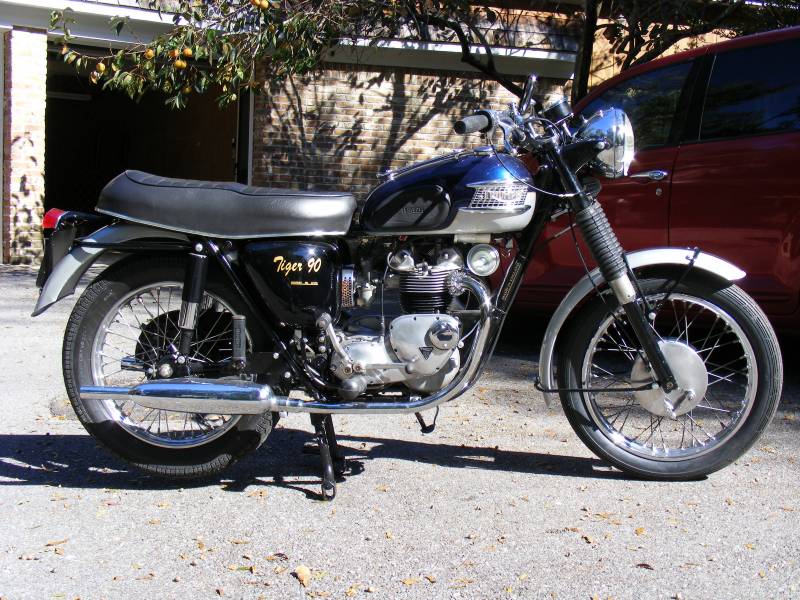
I finished it in base coat/ clear coat automotive paint. After applying
the base coat colors I used gold pinstripe tape between the blue and silver and then clear
coated the pieces with 3 wet coats. I had the press-on T90 decals on the side
covers made at a local sign shop. The standard Triumph oil tank decals were
bought off eBay but can be obtained at Domiracer or any Triumph supplier.
I also applied them before clear coating the pieces. That keeps them from
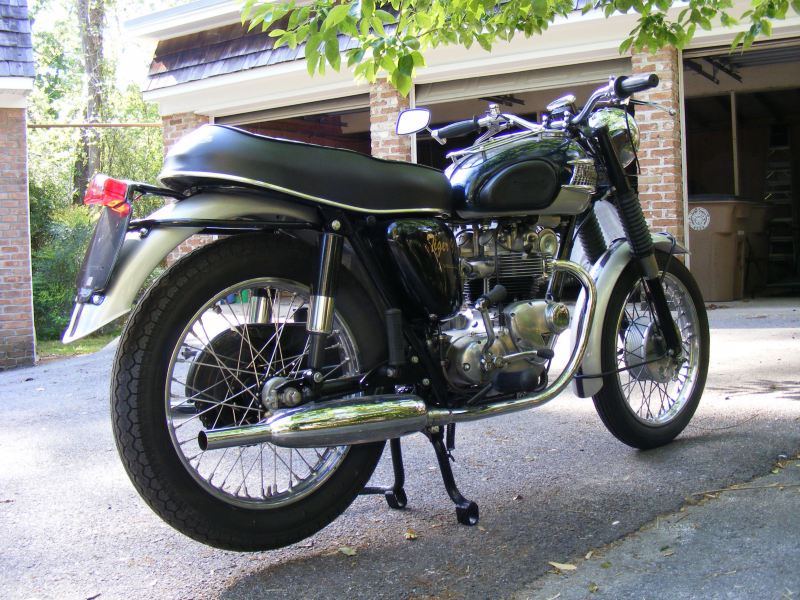
peeling. The shocks looked terrible but actually worked fine. I took them
apart and bead blasted the parts to bare metal and painted the springs and the
shock bodies. I had some upper covers and put them on.
Since taking the picture below I found a pair of reproduction chrome lower
shock covers at Domiracer. They were less than $50 and make a world of
difference. I couldn't have replated them for that price.
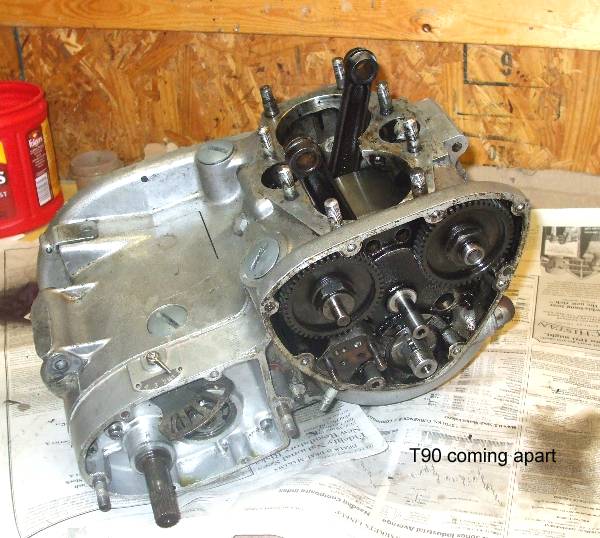
The engine was taken completely apart even though it sounded great.
The notorious sludge trap needed checking. A filled sludge trap means a
blown engine so it was worth the piece of mind.
It, in fact, was quite empty suggesting a recent cleaning. However the
last mechanic had cross threaded a 3/8” pipe plug in the access hole to close it
instead of using the standard Triumph plug.
I replaced it with the correct plug. The head was disassembled and the
valves were lapped. The guides were fine.
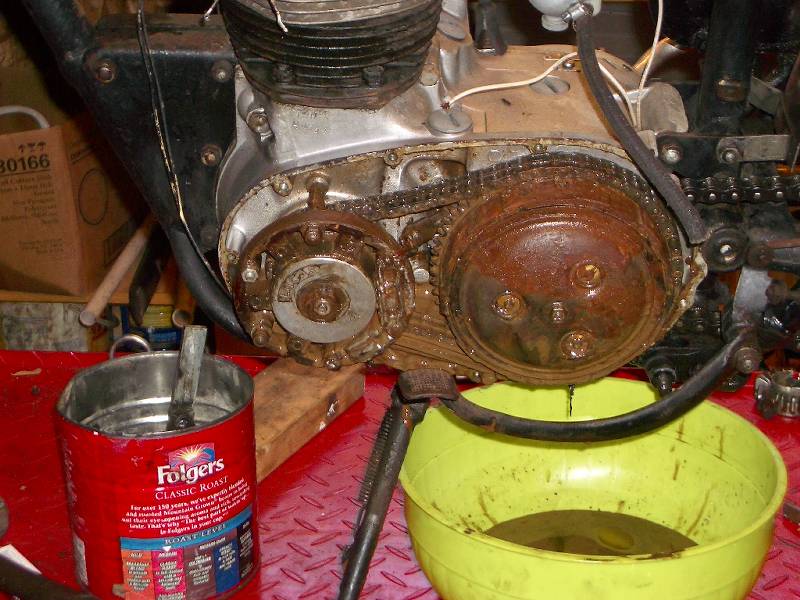
The primary case was full of water and rust. Rain water had slowly
entered through the oil fill plug. Although
ugly, thank goodness there had been enough oil in the mix to protect most of the
important parts. All parts were cleaned (the cases were pressure-washed at the local car wash).
The T90 engine is a little different from the T100 on the inside.
Both use a plain bearing on the right side of the crank but while the T100 has
the famous Triumph polished aluminum rods the T90 uses forged steel rods.
The T90’s crankshaft is also lighter and the bore is smaller.
The stroke of 2.58 inches is the same for both.
The T90 has a claimed 27 horsepower which is not too shabby.
The transmission was the biggest problem. Water had gotten into the
transmission as well. The right side mainshaft needle bearing had frozen up and
had deeply scored the shaft’s races. Fortunately
I had a 500 mainshaft which was identical. The
bronze bushing for first gear was completely missing and the camplate was deeply
pitted from rust. I found a good T100 camplate in my parts bin that fit fine.
The teeth on the shift selector pawls had been ground down for some
reason so I had to order a pair from D&D in
Pensacola
along with the needed bearings. They had
everything in stock. Other than the tedium of honing first gear’s bronze
bushing to fit the mainshaft, everything went together fine.
The rockerboxes, primary cover and timing cover were polished to a nice
luster and the motor was reassembled.
The chassis went together with no problems.
I had a junk speedometer (you know the one: skinned up body, broken glass, etc).
The speedometer actually worked when spun with an electric drill and the
face was still decent. I cut the old bezel off with a Dremel tool using a cut off
disk. I then removed the 3 screws in the back and took out the speedometer’s guts.
I carefully cleaned the face with mild soapy water (don’t use anything
stronger). I put a dab of red paint
on the faded pointer with a small brush and carefully oiled the drive bearing.
I bought a bezel kit for it
which includes the glass and a rubber gasket
from Domiracer. I also ordered a mounting kit with rubber grommets and hardware
which mounts the speedo to the case The case was bead blasted and then painted white on the inside
and gloss black on the outside.
Here is how I put a bezel on a speedo or tach. I turn the assembled unit
face down on a soft cloth so as not to scratch it. Using a ½” wooden dowel
about a foot long or a similar blunt object, push the rim of the bezel down and
toward the speedometer case. You have to push hard so use a rag to hold the
dowel. The rim will bend in and
secure the bezel. Turn the speedometer 180 degrees and do it again. The bezel
should now be securely attached. Turn
it over and give one last check to be sure everything is ok. If it is, flip it
back on its face and keep going around with the crimping tool until the bezel is
nicely crimped all the way around. Be sure to clean the glass on the inside
before crimping.
The wheels actually had
nice rims but the hubs and spokes were rusty. I broke down the wheels and
painted the hubs. I reassembled the wheels with stainless spokes and installed
new tires. The chain adjustors and axel
nuts had long since lost their plating. I just bead blasted them to a nice
luster and then after tightening gave them a dab of clear coat with a small
brush to prevent rust. By this time I had a frame
on its wheels with an engine installed. It was ready for wiring. There
was no wiring harness but that is not a big problem on a Triumph as it is easy
to reconstruct. I used Lucas bullets and rubber covered connectors (available from any Triumph
parts supplier like D&D or Domiracer. Everything was
soldered. Never use crimp connectors on a bike unless you like jiggling wires on a
dead bike alongside the road. The
bike originally had energy transfer ignition with no battery. I had put a battery box in
the bike and a regular 12-volt stator in the motor. adding a rectifier and a
zener diode finished the job. The bike originally had a rotary light switch on the left side cover but
because I did not have the funky 8 pin socket for it I used the standard Triumph
toggle switch in the headlight to control the
lights. The switch on the side is just a dummy. I had a Lucas headlight shell that was drilled for 3
indictor lights. In my case only one is active (high beam indicator). The
other two lights just fill the holes.
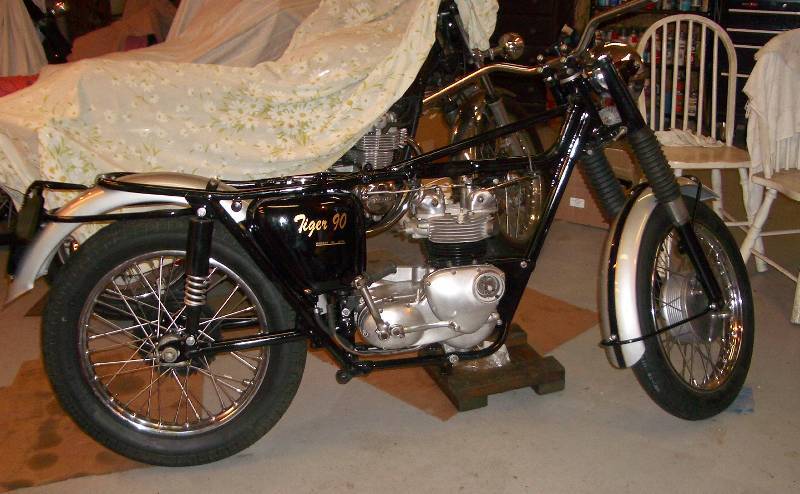
When it came time to test
the motor it started right up. The
150 jet in the carb was too lean. The bike calls for a 180 but I liked the way
it ran on the 170 better. It clearly
has less power than the T100 but it makes up for that in smoothness.
The engine is sweet and it cruises very comfortably at 55 MPH.
It has crisp acceleration and does well in traffic.
And the looks, well they speak for themselves.
Since posting the bike on the web I was contacted by Justin Harvey-James
in Oxford England who is devoted to T90's and their history. Justin kindly
provided me with the following: According to
factory records my bike was made on the 11th November 1965 as a 1966 Model,
one of 105 made that day and the second part of a batch of 150 Tiger 90's.
According to the dispatch records it was originally sent to Guam, one of 28 T90's sent there in
early 1966. This example likely was brought to the states by a service man
returning from duty in Guam. The person I bought it from obtained it in an eBay
auction from a seller in California. If you have any T90 information e.g.
old photos or know the whereabouts of one, please contact Justin at j.harveyjames@btinternet.com.
Justin is compiling a world-wide registry of all surviving T90's and also plans
to make a web site for them.