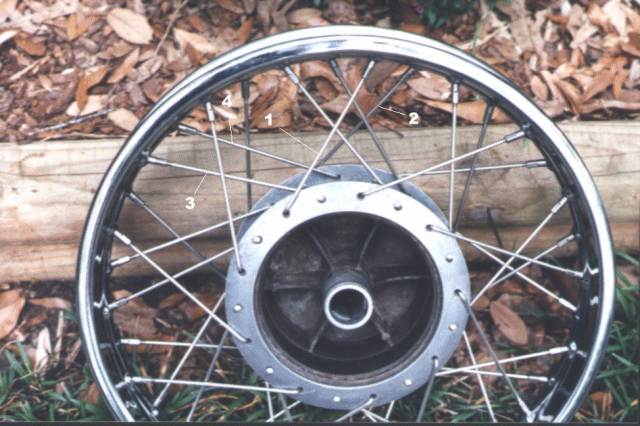
To most amateur mechanics taking a wheel apart to replace the defective parts is, to say the least, intimidating. It need not be, however. Most wheels are extremely simple to lace once you understand the pattern. Figure 1 shows a Ducati wheel. Its lacing pattern is typical of 90 % of motorcycle wheels that you will encounter. Before we explore the lacing patern we must first discuss spoke anatomy. Spokes come in two varieties, hooks and nails. The Ducati wheel pictured uses all hooks. That is the spokes have a hook on the end that secures them in the hub. My BMW R50/2 on the other hand uses nails. The BMW has holes drilled in the hub that face the rim. The spoke is simply pushed through a hole in the hub that directly faces the corresponding hole in the rim. A flat head on the end of the spoke, which looks like the head on a nail (and hence the name), holds it in the hub. My 66 Triumph front wheel has hooks on the brake side and nails on the non-brake side.
The lacing pattern
Now look at the pattern in figure 1. First note that there are 18 spoke holes drilled in the brake side of the hub and that they are evenly spaced around the hub. There are another 18 holes on the non-brake side. Note also that the holes are staggered from side to side making 36 equally spaced holes around the rim alternating from side to side. Note that the picture is viewing the hub from the brake side. In figure 1 I have numbered 4 consecutive spokes going in the clockwise direction on the hub. Spoke 1 is on the outside of the hub, brake side and angles clockwise. Spoke 2 is on the non-brake side, outside and angles clockwise. Spoke 3 is on the brake side, inside and angles counterclockwise. Spoke 4 is on the non-brake side, inside and angles counterclockwise. This pattern then repeats itself eight more times around the wheel. Your wheel may differ in the exact order of the 4 spokes but will follow a similar repetitive pattern of 4's. Look at figure 1 again. Notice that on the brake side every other spoke is outside and angled clockwise (like spoke #1). Those alternate with insides angled counterclockwise. By the way, some bikes such as BSA and Triumph have 40 rather than 36 spokes. In that case there are 10 repeats of 4 rather than 9 repeats of 4.
Before disassembling the wheel be sure to make a drawing of the spoke pattern. This is important so you can put it back together properly. Note that you only need to document 4 consecutive spokes as was done above. Your notes should indicate side of the wheel (usually brake or non-brake), inside or outside, and clockwise or counterclockwise. Finally, be sure to note which side of the wheel you were looking at with reference to the clockwise or counterclockwise bit. I usually just make a quick sketch of 4 spokes. Figure 2 shows my sketch for the Ducati wheel.
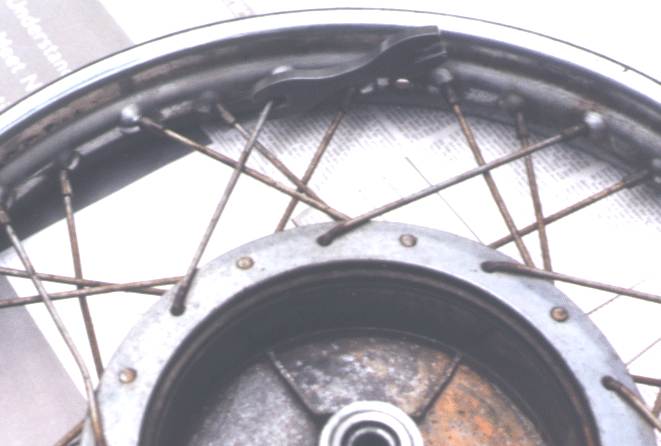
Figure 3 shows a spoke wrench being used to loosen the nipples on this rusty wheel. I bought a universal wrench at the local Honda shop that fits 6 common sizes. You can use a small crescent wrench but a crescent wrench will usually slip and is too bulky to get into tight places. A $6 spoke wrench is a superb investment. Note that most nipples have a screwdriver slot in their head but usually the end of the spoke protrudes into the slot making it impossible to grip with a standard screwdriver. Also if the spokes are rusty a screwdriver may not be strong enough to break them loose. I use the spoke wrench to loosen the nipples until they can be turned with a screwdriver. I also find that a reversible electric drill with a screwdriver bit in the chuck helps take the nipples off quickly. By the time you unscrew 36 spokes your wrist can get very tired. After removing the nipples the rim should lift free of the hub and the spokes can be removed from the hub.
Reassembling the wheel
Now that you have had the rim replated or have a set of new spokes or have done whatever caused you to take the wheel apart, it is now time to put it back together. Clear off a good 3 or 4 feet of workbench. I like to set newspaper down so I have a good clean surface on which to work. I usually lay down a complete section of newspaper and as things get messy I just lift off the top page and discard it. Set the flat hub on the workbench. And identify the spokes. If you have hooks like in the Ducati wheel, notice that the hooks come in two varieties. Inside spokes have hooks with less angle than the outside spokes. Separate the spokes into two piles, insides and outsides. Also some wheels like that BSA Bantam have short spokes on the brake side and long ones on the non brake side. If that is the case, further separate them into longs and shorts. Now start threading the spokes onto the hub in the proper inside-outside orientation until all holes are filled. If you have nail type spokes you job is even easier - just push them in their holes. Again lay the hub flat on the work bench and arrange the spokes in their clockwise-counterclockwise orientation as per your diagram. Now take the rim and lay it over the hub and spokes.
Note that holes in the rim are drilled to face one side or the other and to accept either clockwise or counterclockwise spokes. Rotate the rim until the pattern of the holes in the rim matches the spoke's orientation. If you cannot find a fit, try flipping the rim over. When properly oriented each spoke should point to a hole in the rim that is aligned with it. Always start with the bottom-most layer of spokes (outsides next to the bench top). Put one spoke in a matching hole in the rim and loosely screw a nipple on to it (just 2-3 turns). Note that you should put a drop of oil on the threads before starting the nipple to preserve the threads and so you can adjust for proper torque. Skip 4 holes and put the next bottom-most spoke in that hole and start another nipple. Go around the wheel until all bottom spokes are in place. Now do the next layer of spokes (bottom inside) put each in its respective hole and start the nipples. Now come up to the top inside layer and do it. Finally, align the top outside spokes and start their nipples. At this time you should have what looks like a complete wheel. Check carefully at this time for correct orientation of all the spokes. When satisfied that things are as they should be go around and screw the nipples in just to the point where the hub starts to becocme firm in the wheel. It is important that all nipples are screwed on to the same amount in this step so that the wheel will be at least close to properly aligned. For example, you might turn each nipple until the spoke body is just visible in the screwd river slot. You will have to use your judgement here as it is impossible to predict what length your particular spokes will be. Do not attempt to torque down any nipples at this point.
Aligning the wheel
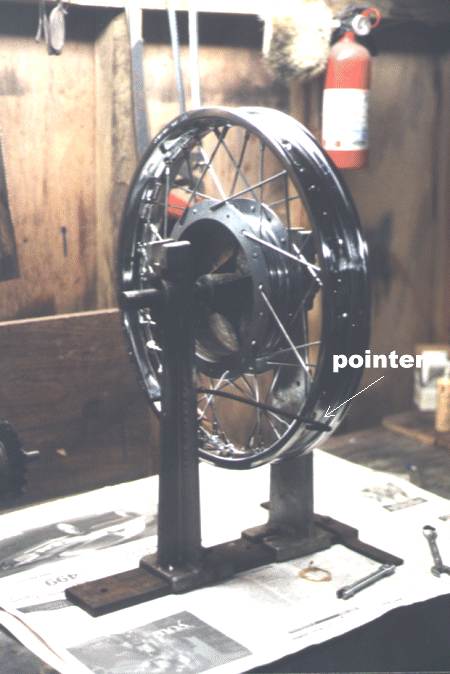
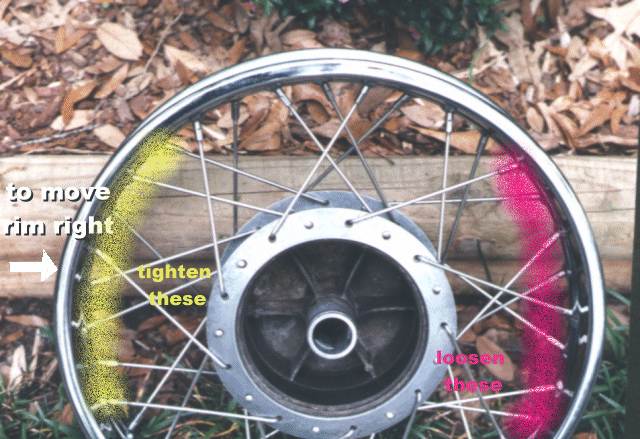
A wheel stand as shown in figure 4 is a useful tool for aligning a wheel but is not a necessity. For years I simply clamped an axle in a vise to hold the wheel firmly so it could be spun to check for alignment. Note that the wheel stand has a pointer guide attached to it which can be positioned near the rim to check for run-out as the wheel is spun. If you are using a vise tape a piece of coat hanger wire to the edge of the bench to serve this as a pointer. The key to truing the wheel is to understand how the spokes move the rim. Lets say you spin the wheel and find a high spot. Assume that the high spot is on the left side of the wheel in figure 5 . The figure shows how to move the rim to the right relative to the hub. To do that you loosen spokes on the right side of the wheel (indicated by red) and tighten the corresponding spokes on the left side of the wheel (indicated by yellow). To move the rim from side to side you tighten spokes on the side you want the rim to move toward and loosen those on the other side as shown in figure 6. By repeatedly adjusting spokes you should be able to get the rim so that it runs true when spun. I like to get everything within 1/8 of an inch maximum wobble. Take your time and think about what you are doing. A little piece of masking tape can be useful for marking a high spot.
Getting the proper preload on the spokes.
This is the most difficult part to describe. The spokes can be tightened to a torque spec but few of us have torque screwdrivers. If the spokes are too loose the wheel will flex back and forth as you ride the bike. Too tight and the hub may explode. I use the ear method. Tap a loose spoke with a wrench and it has a dead sound. As you tighten it makes a nice ringing sound whos pitch increases as you continue to tighten. Under proper torque the spoke should have about the same pitch as that of an empty wine glass when tapped with a fork. Go tap some spokes on an assembled wheel to get a feel for the sound. Once the wheel is true, go around and tap spokes. Tighten them little by little until they all have a nice ring. After tightening one spoke a turn or two tighten the spoke on the opposite side. Tap and listen. Go around the wheel several times sort of at random so that you do not loose your alignment by tightening up spokes on just one side of the wheel. Eventually all spokes will be adjusted.
Now do the final truing. The torquing down of the nipples may have put the wheel back out of alignment. Make final truing using the same procedure as above but now the spokes will be much tighter. In order to true up the wheel some spokes may have to be tighter (higher pitch) than others. That is to be expected especially if your rim has some dings in it.
Where to get parts
The best place to get spokes and rims is Buchanan's frame shop in California. Their phone number is (626 969 4655). They have extensive listings of most motorcycle models and supply the spokes in stainless steel which look good and last forever. If they do not list your bike send them the old examples and they will make a custom set for you. Spokes will run from $100 to $120 per wheel. I have cleaned spokes with a wire wheel and painted them silver but that is desperation. eBay has has spokes and rims for many Japanes models. A good chrome plating shop can often replate a rim for about 1/2 the price of a new one if it is not too rusty. You can paint rims and some bikes look good with painted rims. A friend of mine restored a Vellocette with painted rims. He had them repainted black and had some gold pin stripes put on them. They looked super until he tried to mount a tire. Tire irons and painted rims do not get along. After being super careful he still put a few gouges in it. Powder coating would have been a better idea. Here is a tip. Triumphs use 40 spoke rims that are hard to find at a good price. The old Honda 750s also used 40 spoke rims and they will fit a Triumph hub. Good Honda rims are usually plentiful at your local junkyard. A word of caution, though, a purist will notice that the rims are Japanese.