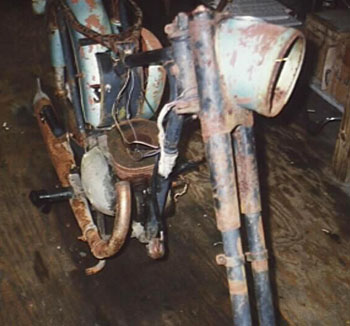
Breathing New Life Into a BSA Bantam (Part 1)
My friend Jim Arrington called one night and informed me that
he had found a pile of BSA Bantam Parts at a good price. D&D
Cycles in Pensacola is a great source of British parts and Dink,
the owner had one pretty good looking Bantam and a ragged-out
parts bike, 5 or 6 engines in various stages of disassembly and a
lot of NOS parts. He wanted $500 for the whole pile. A deal was
made and we headed back to Mobile with a pickup truck full of
Bantam stuff. The first order of business was who got the shiny
bike? We flipped a coin and I lost so Jim took the Blue Bantam
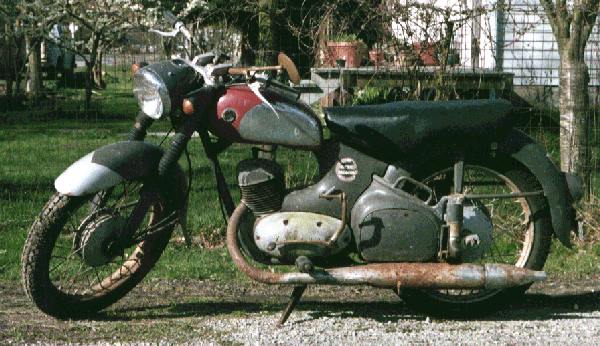
and I took the Parts bike that you see on this page. Just about
the time my wife thinks I can’t bring home anything
grundgier I show up with something like this.
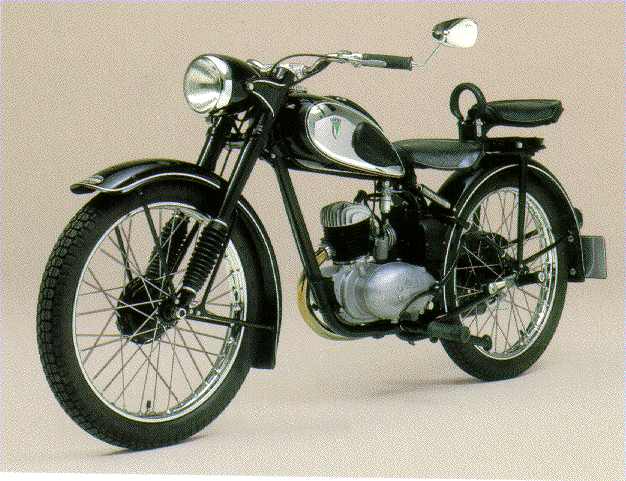
 After
world War II the Allies were busy picking German businesses
clean. Part of the war reparations package was the little DKW motorcycle. This German 125 cc two-stroke
was elegantly simple and one of the most copied motorcycles in
the world. Both BSA and Harley jumped on this package and began
producing it under their own name on each side of the Atlantic.
The Harley version was called the Hummer and the British
counterpart the Bantam. Mechanically the two motors were
identical except the BSA was a mirror image of the Harley with a
right-hand shift. The bikes were not fast but extremely rugged.
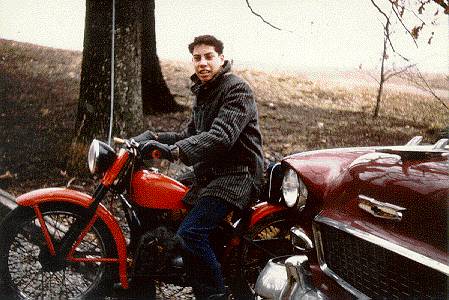
As a kid I rode a Hummer and a picture of me on it can be seen by
clicking here. The Bantams found an
eager market in post-war England where hundreds of thousands were
sold to Brits desperate for affordable transportation. In the US
the Hummer was always considered as a kid’s toy and over the
years seemed to evolve into a cheaper and cheaper motorcycle. On
the other hand, BSA took the Bantam seriously and added a
sophisticated rear swing arm, good hydraulic forks and wipac
electrics. By the late 60s the Bantam was available in a 175 cc 4
speed screamer developing 14 horsepower (up considerably from the
original 4). The investment paid off because until the Japanese
invasion of the 70’s, the Bantam was one of BSA’s top
money makers. Relatively few Bantams were sold in America where
big bikes were preferred so there are very few of these around
today. My bike was a D7 which was mid 60’s. It sported the
175 cc engine but only 3 speeds in the tranny. BSA and Harley
were not the only ones to copy the DKW. The Japanese produced it
as the Yamaha YC-1 and the
Russians sold it as the Minsk (note the
concentric shift and starter shafts that are unique to the
design).
After
world War II the Allies were busy picking German businesses
clean. Part of the war reparations package was the little DKW motorcycle. This German 125 cc two-stroke
was elegantly simple and one of the most copied motorcycles in
the world. Both BSA and Harley jumped on this package and began
producing it under their own name on each side of the Atlantic.
The Harley version was called the Hummer and the British
counterpart the Bantam. Mechanically the two motors were
identical except the BSA was a mirror image of the Harley with a
right-hand shift. The bikes were not fast but extremely rugged.
As a kid I rode a Hummer and a picture of me on it can be seen by
clicking here. The Bantams found an
eager market in post-war England where hundreds of thousands were
sold to Brits desperate for affordable transportation. In the US
the Hummer was always considered as a kid’s toy and over the
years seemed to evolve into a cheaper and cheaper motorcycle. On
the other hand, BSA took the Bantam seriously and added a
sophisticated rear swing arm, good hydraulic forks and wipac
electrics. By the late 60s the Bantam was available in a 175 cc 4
speed screamer developing 14 horsepower (up considerably from the
original 4). The investment paid off because until the Japanese
invasion of the 70’s, the Bantam was one of BSA’s top
money makers. Relatively few Bantams were sold in America where
big bikes were preferred so there are very few of these around
today. My bike was a D7 which was mid 60’s. It sported the
175 cc engine but only 3 speeds in the tranny. BSA and Harley
were not the only ones to copy the DKW. The Japanese produced it
as the Yamaha YC-1 and the
Russians sold it as the Minsk (note the
concentric shift and starter shafts that are unique to the
design).
 The
way to approach any project like this is simply take it apart.
Disassembly was easy enough until I got to the motor. The Bike
had sat outside in the weather with the head off. The piston was
rusted to the cylinder and the crank would not turn. A good
sledge hammer and lots of penetrating oil finally got the piston
to move. The motor was a mess but the cylinder could be rebored.
The transmission was bad with many teeth missing on the cogs and,
other than being educational on how a Bantam motor was put
together, there was little that was usable there.
The
way to approach any project like this is simply take it apart.
Disassembly was easy enough until I got to the motor. The Bike
had sat outside in the weather with the head off. The piston was
rusted to the cylinder and the crank would not turn. A good
sledge hammer and lots of penetrating oil finally got the piston
to move. The motor was a mess but the cylinder could be rebored.
The transmission was bad with many teeth missing on the cogs and,
other than being educational on how a Bantam motor was put
together, there was little that was usable there.
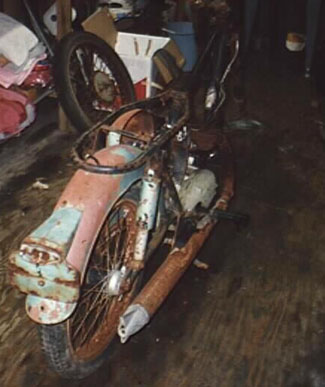
The chassis was fairly complete right down to the chain guard
which was missing on Jim’s bike. Another surprise was the
pristine condition of the petrol tank. I love those two-cycle
bikes. The oil in the gas protects the gas tank forever. A trip
to my friend’s bead blaster quickly had the parts cleaned to
bare metal. The front fender had some pretty fair dents as did
the tank. The worst was the nacell which had some really deep
dings. These were all fixed with Bondo. I was in a painting mood
and decided to try to paint this one myself (despite my advice to
the contrary on the previous page). My son Doug and I painted the frame , side covers and forks
black and the fenders and tank a light metallic green. I painted
a white panel on the tank sides with a red pin stripe. Jim
Arrington found a Bantam tank decal at Baxter Cycle which I
applied to the panel prior to the clear coat. The brake plates
and inner parts of the Shock absorbers were painted with my
beloved Hammertone paint (I buy it in a spray can at Ace
Hardware).
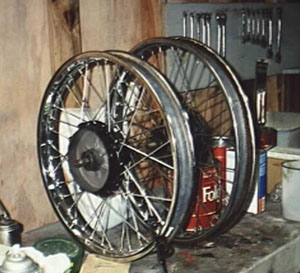
Wheels were another matter. The rims on the bike were shot.
There was a good 19" front wheel in the NOS pile (the
original was 18"). I just happened to have an exact match
for the 40 spoke-18"rear rim in my parts pile which I had
picked up for a few dollars at a sale several years ago. Jim
Arrington found a package of #10 blank spokes in one of his parts
boxes. Jim also had a spoke thread roller which he let me use so
I was in business. After several evenings cutting and rolling
spokes I was ready to go to work. I stripped the old wheel down
to the hub which I pained with black engine enamel (Auto Zone)
and baked at 300 degrees for an hour. That makes a hard gloss
finish which is extreemly resistant to heat. The baking smells up
the house so do it when the wife is away. I relaced the wheel
with the new spokes and it looked better than
new . I had ordered two new tires from JC Whitney and mounted
them to complete the job.
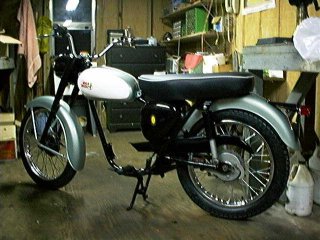 I
reassembled the chassis using SAE bolts wherever possible. This,
of course, was a Whitworth machine, but hey, I am no purist. All
I had for a seat was a rusty pan. But after bead blasting and
painting the pan looked pretty good. A-1 Auto Trim here in Mobile
covered the seat for me. For a pad we cut up an old Moto Guzzi
seat that I had kept for just such an occasion. My attention is
now turned to the engine and I will tell you about that next
month along with more pictures (if all goes well). See you then.
I
reassembled the chassis using SAE bolts wherever possible. This,
of course, was a Whitworth machine, but hey, I am no purist. All
I had for a seat was a rusty pan. But after bead blasting and
painting the pan looked pretty good. A-1 Auto Trim here in Mobile
covered the seat for me. For a pad we cut up an old Moto Guzzi
seat that I had kept for just such an occasion. My attention is
now turned to the engine and I will tell you about that next
month along with more pictures (if all goes well). See you then.
Click here to read part 2
Return to Jim Downey’s
Restoration Page